IoT Smart Garden Project
Published on: Jan 12, 2024
A capstone project for my Software Engineering degree, a system that automatically monitors and controls the environment.
For my fourth-year capstone project, my team and I built a smart garden system designed to monitor and automatically adjust environmental conditions in a garden. This year-long project involved a team of students working together to plan, develop, and present a comprehensive project, demonstrating the breadth of knowledge gained throughout the program.
Our goal was to create an IoT-enabled smart gardening and farming system to support food growth in urban areas. Our system monitored environmental growth conditions in a garden, then transmitted the readings to a cloud-based data collection and analysis system. The data was used to inform users of real-time and historical conditions through a cross-platform mobile application, as well as to drive automated proactive actions in the garden, adjusting conditions to meet the ideal levels as needed by the specific plants planted.
Our System Design
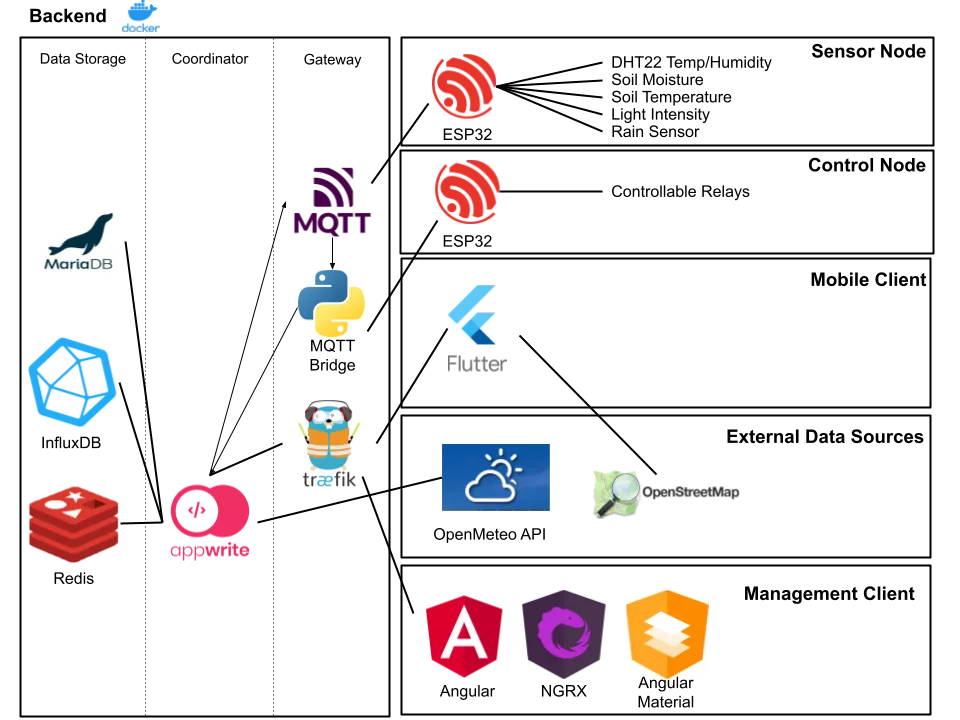
The system comprised four main components: the sensor and control nodes (IoT devices deployed in the gardens), the cloud services that received, processed, analyzed, and stored data, a mobile application for user interaction with their devices, and a management console for provisioning new devices.
IoT Edge Devices
The sensor and control nodes deployed in gardens were based on the ESP32 microcontroller. The ESP32 supports Wi-Fi, enabling direct communication with our cloud services. I chose these microcontrollers because they are inexpensive, relatively power-efficient, and incorporate a large set of communication interfaces, analog, and digital GPIOs.
Sensor Selection
We chose the following sensors to effectively monitor the growing conditions of a garden:
- DHT22 (Air temperature and humidity sensor)
- Capacitive Soil Moisture Sensor
- Soil Temperature Sensor
- TSL2591 (High Dynamic Range Digital Light Sensor)
- Rain Sensor
IoT Software
I opted to write the software for the IoT devices in C++ using the PlatformIO SDK, providing a more developer-friendly environment compared to the more common Arduino IDE. C++ is far from my comfort zone, so I gladly accepted any help. There are libraries that provide MQTT and JSON support for these devices. MQTT was used for bidirectional communication with the IoT devices and the cloud. It’s a low-overhead solution perfect for our application. The code was fairly bare-bones, sufficient to obtain readings from all sensors and upload them to our cloud services.
IoT Hardware
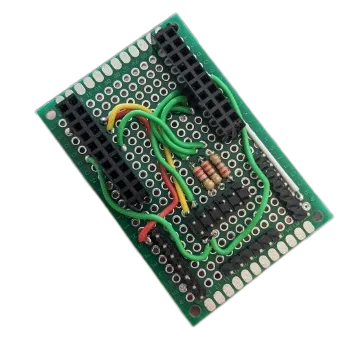
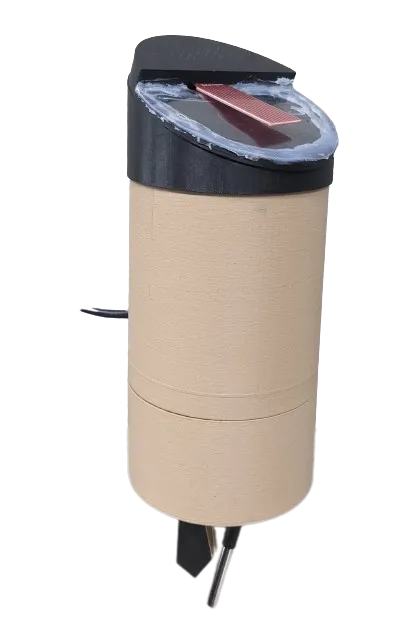
For the hardware aspect, I designed and 3D printed an enclosure to house our microcontroller and all its sensors. The design included a sloped roof and overlapping tiered sections to prevent leakage. It was segmented into three sections to allow for quicker iteration as the project progressed. A change in one sensor didn’t necessitate a new enclosure, only the part to which it was attached. I also soldered a prototype board to facilitate the attachment of all components.
Application Backend
Given the system’s scale, we early on decided to use Appwrite, a self-hosted backend-as-a-service solution. Appwrite offered a feature set similar to Firebase, but with full control over its deployment. This choice was primarily driven by the context of the school project; however, I would definitely recommend Firebase in other contexts. We primarily utilized APIs for authentication flows, database access, and cloud functions.
Database Schema
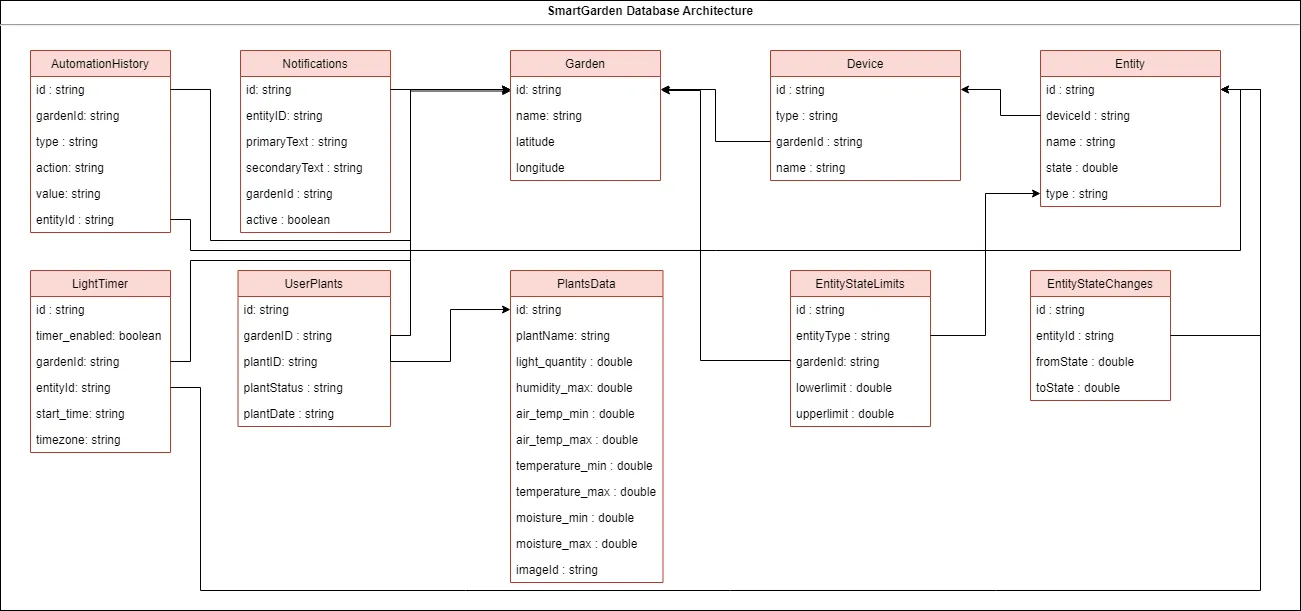
Our data model was straightforward, especially considering Appwrite abstracted permissions and user management away from the core data models. The main entities central to the entire system were Entities, Devices, and Gardens, with other entities supporting specific features like the automation engine and notifications.
Deployment
The backend was deployed on a virtual private server using the Linode service. A Docker-compose file was created to configure all services required to run the application, including Appwrite, Mosquitto (MQTT Broker), and MQTTBridge (a service bridging Mosquitto and the Appwrite HTTP API).
Management Client
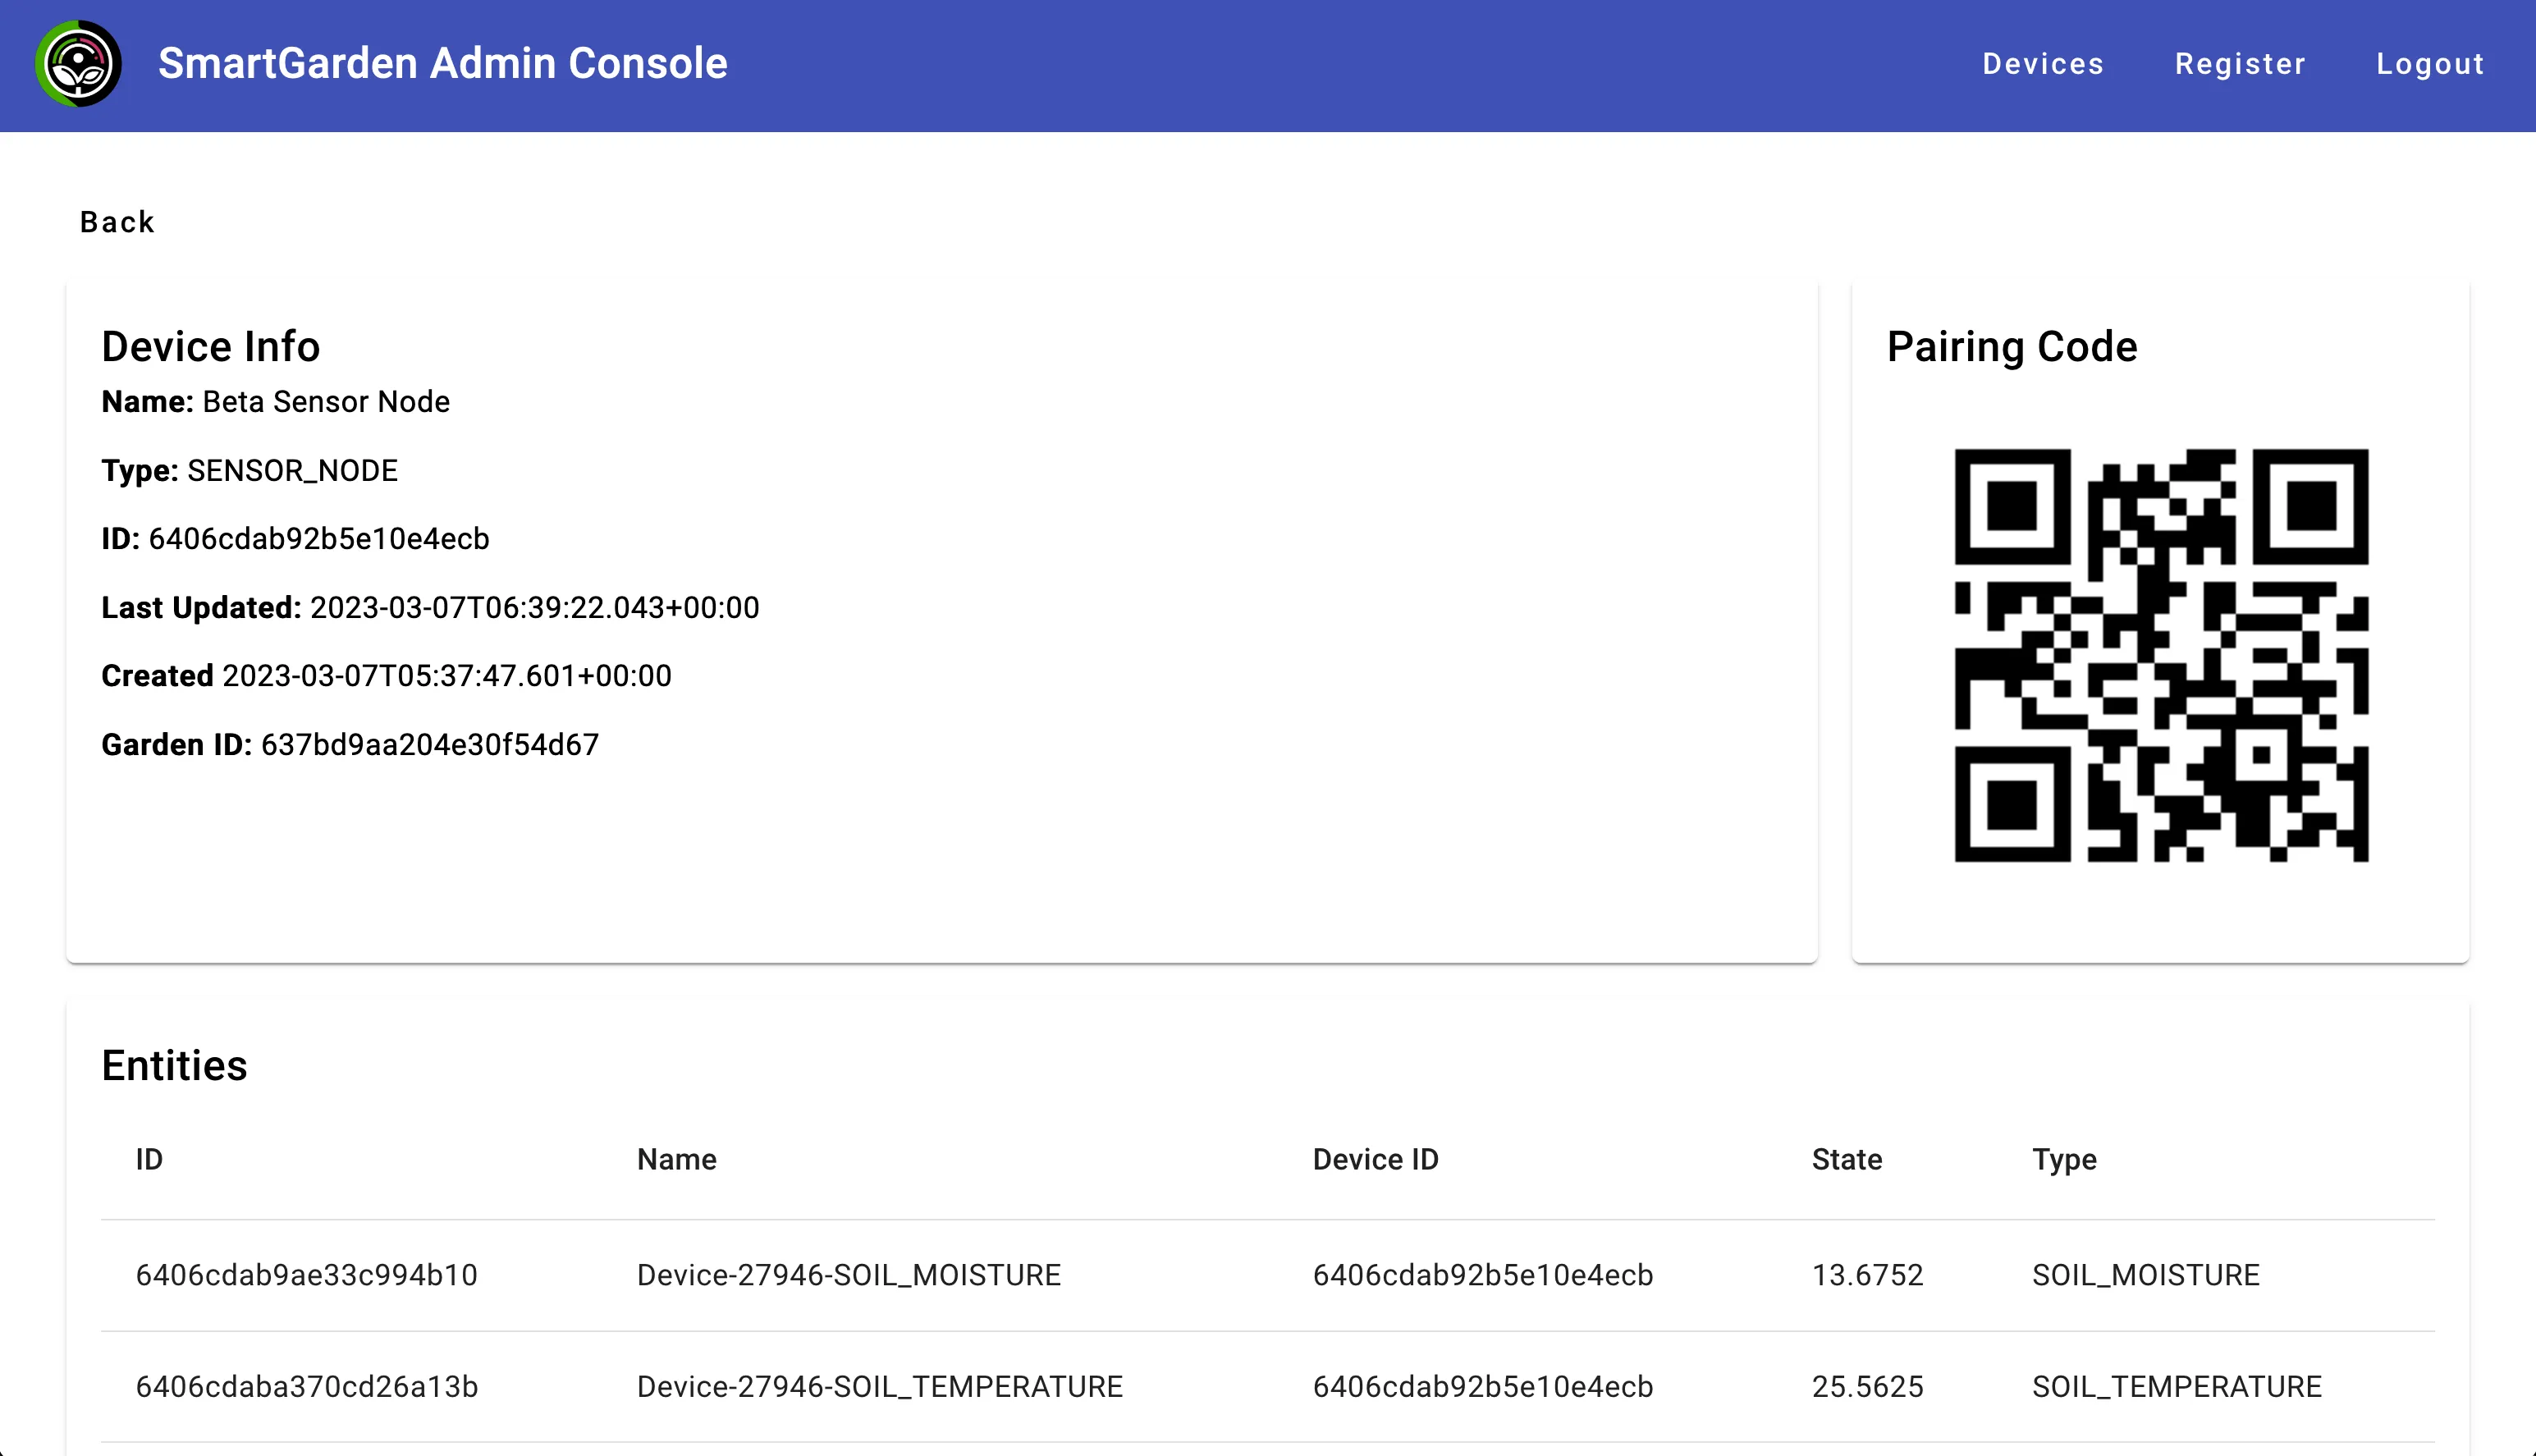
I developed a management console that enabled the provisioning of new devices in the system. It provided an interface for creating, monitoring, updating, and deleting all devices connected to the system. It was also responsible for generating pairing QR codes, which could be read by a user’s mobile client to associate a device with their account. This application was built using Angular, NGRX, and Angular Material.
Mobile Client
The mobile client for our system was built using Google’s cross-platform Flutter development toolkit. We chose Flutter for several reasons: it allowed us to write a single codebase that could run on multiple platforms, including iOS, Android, web, and desktop; it provides a hot reload feature which sped up development cycles; and it offers a rich set of pre-designed widgets for building attractive and responsive UIs. While there are other tools like React Native offering similar benefits, Flutter’s familiarity with the UI tools we had used in school meant that team members unfamiliar with web development technologies could be more comfortable.
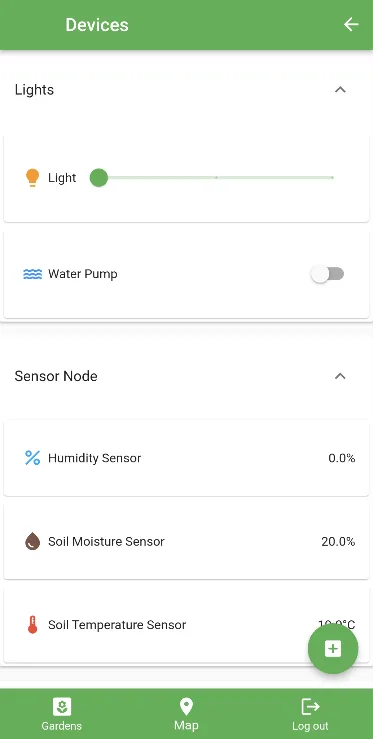
The mobile app featured several key functions for interacting with the garden. It provided a map overview of all a user’s gardens, using the flutter_map library and OpenStreetMap tiles to display pins representing different sensor and control nodes, updating according to the state of each node. It also enabled real-time monitoring and control of nodes and offered garden management tools such as adding devices, sharing a garden, and changing node configurations.
My primary contributions to the client app included developing parts of the map interface and the real-time control and monitoring screen. Our backend system provided a real-time API that streamed the latest sensor values to the app. Devices that could be controlled featured toggles or sliders for operation.
Conclusion
This was a really fun project to work on, covering many different aspects of our Software Engineering degree. Having the freedom to work on both the software and hardware, including manufacturing aspects, was particularly rewarding. However, there were valuable lessons learned. In hindsight, we should have focused more on a limited subset of features, developing them end-to-end, rather than attempting to implement as many features as we did. An initial focus on design and architecture could have mitigated some development challenges. Often, we had to create “mock” components of the system and hope our solutions would integrate well with the final version, which was not always the case. Additionally, the project scope provided by the coordinators was very broad; we should have advocated for a more focused scope to prioritize key features. This experience has left me with numerous ideas and potential improvements for a version 2 of the project!